
Selecting the right lighting for a standard 2.6m Housing & Development Board (HDB) flat ceiling requires balancing spatial clearance with effective light distribution. Because a 2.6m ceiling height places the light source relatively close to eye level, bulky or deeply suspended fixtures can make rooms feel cramped and cause uncomfortable glare. To achieve a balanced, spacious feel, the ideal approach is to select low-profile, flush-mount MegaMan LED ceiling lights that distribute light widely and evenly across the room. By focusing on ultra-slim designs, appropriate lumen outputs, and high-quality diffusers, you can maintain maximum headroom while ensuring every corner of your flat is comfortably illuminated. This guide outlines the essential specifications, sizing rules, and safety checks to help you choose the perfect setup for your home.
Understanding the 2.6m Ceiling Constraint in HDB Flats
A 2.6m ceiling is standard across most modern HDB flats, but it leaves limited vertical clearance once furniture and occupants are factored in. Installing heavy, ornate, or low-hanging pendant fixtures physically reduces this headroom, drawing the eyes downward and making the living space feel significantly smaller than its actual footprint. For taller occupants, low-hanging fixtures also present a physical hazard, making flush-mount designs a practical necessity rather than just an aesthetic preference.
When a light source is positioned closer to the floor, the angle of light projection narrows relative to the living plane. This proximity can create harsh, direct glare when looking up, as well as intense, localized pools of light directly beneath the fixture, leaving the corners of the room in deep shadow. To counteract this, the light must be diffused over a broader area to soften the transition between illuminated zones and shadows, creating a more visually comfortable environment.
Products mentioned in this guide
![[2yrs warranty] Megaman Easy Replace Surface mounting LED Ceiling Light/ 15W/18W High Brightness](https://img.lazcdn.com/g/p/109d108fb7cca4fc5f79e9d3135db26a.jpg_400x400q80.jpg_.webp)
Prices are valid at publication and may change. Please refer to the product page for the latest price.
Low-clearance ceiling cavities or flush-mount installations can trap warm air, particularly in Singapore’s warm and humid tropical climate. While LED technology is highly efficient, the driver and diodes still generate heat that must dissipate effectively to prevent premature component failure and maintain consistent light output over time. Choosing fixtures with robust thermal management and heat-dissipating housings ensures the electronics remain cool even during extended use.
Key Specifications to Check in MegaMan Ceiling Lights
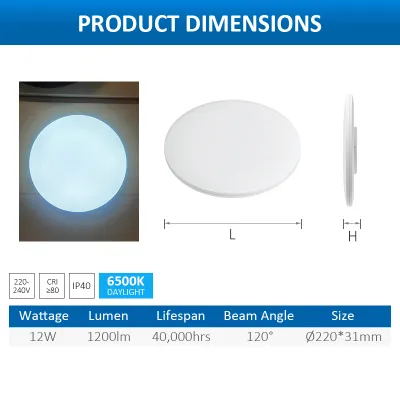
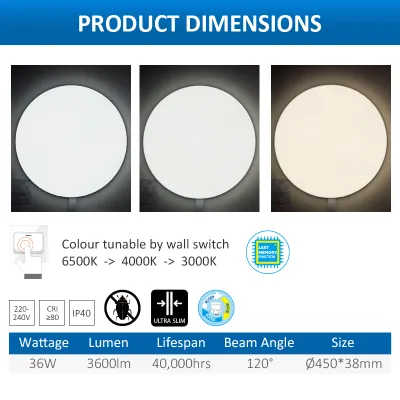
When browsing MegaMan’s product catalog or retail packaging, prioritize the physical depth of the fixture. Look for ultra-slim or flush-mount designs, ideally with a profile thickness of under 50 millimeters, which sit close to the concrete ceiling slab to preserve precious vertical space. A slim profile helps the fixture blend seamlessly into the ceiling, creating an illusion of height and openness in compact rooms.

Ensure any selected model matches Singapore’s standard 230V voltage frequency and carries the appropriate local safety marks or international electrical certifications. Verifying these details on the product label is a critical first step before purchasing any electrical appliance, as it guarantees the internal driver is designed to handle local grid conditions safely.
Do not rely solely on wattage to estimate brightness, as LED efficiency varies. Instead, check the lumen (lm) rating on the MegaMan packaging to match the light output to the specific room volume, preventing over-illumination that can cause visual fatigue in compact HDB spaces. A general rule of thumb is to aim for higher lumens in task areas and lower, softer outputs in relaxation zones.
For multi-functional HDB spaces, look for fixtures offering a high CRI (typically 80 or above) to ensure colors appear natural. Consider warm white (2700K to 3000K) for cozy bedrooms, cool white (4000K) for balanced living areas, and daylight (6000K to 6500K) for task-oriented spaces like kitchens. Some modern fixtures also offer selectable color temperatures, allowing you to adjust the ambiance via an internal switch before installation.
A wide beam angle, preferably 120 degrees or more, is essential for low ceilings to spread light horizontally before it reaches eye level. Check that the fixture features an opal or frosted polycarbonate diffuser, which softens the LED points and eliminates harsh, direct glare. This wide distribution ensures that light bounces off the walls, making the entire room feel brighter and more expansive.
Sizing and Placement Guidelines for HDB Rooms
In the main living room, a single central fixture may not distribute light evenly to the edges of a rectangular layout. Consider a moderately sized, wide-dispersion flush-mount light as the primary ambient source, supplemented by perimeter track lighting or floor lamps to fill in shadows without lowering the ceiling line. This layered lighting approach provides flexibility, allowing you to adjust the brightness depending on the time of day or activity.
Bedrooms require a softer, more relaxing atmosphere where direct glare is minimized, especially when lying in bed. Selecting a lower-lumen MegaMan fixture with an indirect light distribution pattern or a highly diffusing cover helps protect your eyes from direct exposure while providing sufficient ambient light for daily activities. Placing the fixture slightly away from the bed’s direct overhead line can also improve visual comfort.
These utility zones demand high visibility and moisture protection. Verify the Ingress Protection (IP) rating on the product packaging; bathrooms require at least an IP44 rating to withstand steam and occasional splashes, while kitchens benefit from high-lumen task lighting positioned directly over countertops to prevent working in your own shadow. Ensuring the fixture is properly sealed also prevents dust and grease buildup in kitchen environments.
A frequent error is installing an oversized fixture in narrow HDB corridors or small utility yards, which visually overwhelms the narrow passage. Conversely, placing a single small fixture in a large bedroom can result in dark corners; measuring the room dimensions and checking the manufacturer’s recommended coverage area prevents these layout mismatches. For long hallways, installing multiple smaller, low-profile lights in a row provides even illumination without crowding the space.
Installation and Electrical Safety Checks
Before mounting any new fixture, inspect the existing ceiling point for signs of wear, brittle insulation, or loose connections. Ensure the concrete ceiling slab is even and free of structural defects, and verify that the junction box is securely anchored to support the weight of the new light. If you notice any cracked wires or signs of overheating from previous fixtures, address these issues immediately before proceeding.
Always isolate the electrical supply at the main consumer unit (DB box) before attempting any inspection or installation work. Never rely solely on the wall switch to cut power, as incorrect neutral wiring can still carry a dangerous electrical current. Use a reliable voltage tester to confirm the wires are completely dead before touching any electrical connections.
For any complex installations, fixed wiring alterations, or when adding new switch lines, always engage a Licensed Electrical Worker (LEW) certified in Singapore. Professional installation ensures compliance with local electrical standards and guarantees that the mounting hardware is safely secured to the concrete slab. This is especially important for flush-mount fixtures, which must be mounted perfectly level to function correctly and look aesthetically pleasing.
HDB flats often feature structural concrete beams, concealed utility pipes, or uneven plaster finishes. Avoid drilling directly into structural beams without professional guidance, and ensure the flush-mount fixture sits flat against the ceiling surface to prevent dust and insects from accumulating inside the housing. If the ceiling surface is uneven, minor plaster adjustments may be required to ensure a secure, flush fit.
Frequently Asked Questions (FAQ)
Can I use a dimmable MegaMan ceiling light with my existing wall switch?
Standard wall switches are typically designed for simple on/off operations and may not support dimming functions. To use a dimmable MegaMan LED ceiling light, you must verify that the specific model is explicitly labeled as dimmable on its packaging and pair it with a compatible dimmer switch, such as a trailing-edge or leading-edge dimmer, as specified by the manufacturer’s installation guide. Attempting to use a non-dimmable fixture with a dimmer switch can cause flickering, buzzing, or permanent damage to the LED driver.
How do I safely clean and maintain flush-mount ceiling lights?
To clean your flush-mount fixture safely, first switch off the power at the wall and allow the light to cool completely to avoid thermal shock or electrical hazards. Gently wipe the exterior diffuser with a dry, anti-static microfiber cloth to remove dust; avoid using harsh chemical solvents, abrasive pads, or excessive moisture, which can degrade the acrylic or polycarbonate cover over time. If the interior of the diffuser accumulates dust or insects, refer to the manufacturer’s instructions to safely detach the cover for a gentle dry wipe.

Community discussion
Share your experience or ask a question. Comments are reviewed before publication.