
Creating a gallery wall with magnetic photo frames is an elegant way to display personal memories, art prints, and photography. Unlike traditional frames that require tedious disassembly to swap pictures, magnetic frames rely on strong, integrated magnets to sandwich your photos securely. This design allows you to refresh your display in seconds, making it an ideal choice for dynamic, modern interiors. Achieving a polished, professional look requires careful planning, selecting the correct mounting hardware for your specific wall type, and executing a precise installation.
In Singaporean homes, where concrete walls are common in Housing & Development Board (HDB) flats and condominiums, choosing the right hanging strategy is essential to avoid unnecessary wall damage. By understanding the structural demands of your walls and the physical characteristics of your frames, you can build a stable, visually striking gallery display. This guide covers everything from initial spatial layout and mounting selection to step-by-step hanging instructions, styling tips, and long-term maintenance.
Plan Your Gallery Wall Layout Before Making Marks
Before hammer meets nail or adhesive touches paint, you must plan the spatial arrangement of your display. Skipping this step often results in uneven spacing, awkward proportions, or a cluttered appearance that detracts from your home’s decor. Begin by measuring the total wall area dedicated to your display, noting any nearby architectural features such as light switches, air conditioning units, or door frames that could disrupt the visual balance.
Products mentioned in this guide


Prices are valid at publication and may change. Please refer to the product page for the latest price.
Next, select a layout style that complements the architectural lines and overall design theme of your room:
- Structured Grid: Ideal for minimalist and modern interiors. This layout uses frames of identical sizes arranged in perfect rows and columns with uniform spacing (typically 5 cm to 8 cm apart). It creates a clean, symmetrical, and highly organized visual effect.
- Eclectic Salon Style: Best suited for relaxed, creative, or transitional spaces. A salon layout mixes different frame sizes, orientations, and even depths. The key to keeping this style cohesive is maintaining a consistent gap between all frames and building the arrangement outward from a central focal point.
- Linear Alignment: Excellent for narrow spaces such as hallways or entryways. Aligning the top, bottom, or center line of your frames along a single horizontal axis guides the eye smoothly through the space.
To visualize these layouts without damaging your walls, create paper templates. Trace the outline of each magnetic photo frame onto kraft paper, newspaper, or printer paper, and cut them out. Label each paper template with the specific photo or frame it represents.
Using low-tack painter’s tape, arrange these paper templates on your wall. This temporary setup allows you to step back, evaluate the composition from different angles, and adjust the spacing easily. Keep the templates on the wall until you are completely satisfied with the balance and flow of the arrangement.
Choose the Right Hanging Method for Your Wall and Frame
Selecting the correct mounting hardware is critical for safety and stability. The choice depends on the construction of your magnetic photo frames and the structural material of your walls.

Identify Your Frame Type
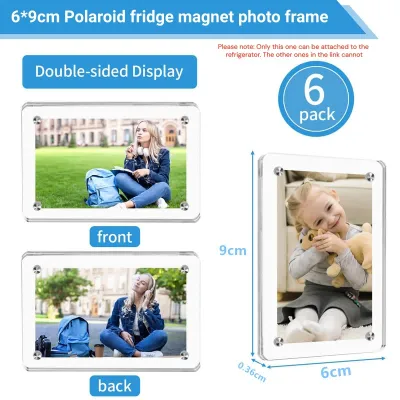
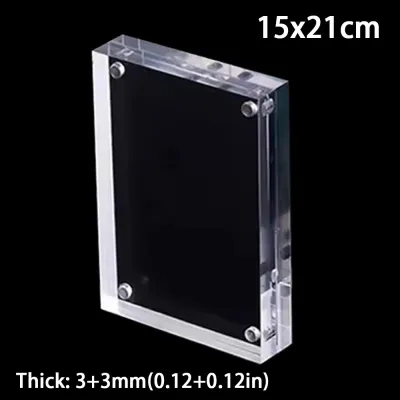
Magnetic photo frames generally fall into three categories. Acrylic magnetic sandwich frames consist of two thick blocks of acrylic held together by small neodymium magnets at the corners; these are sleek but can be surprisingly heavy. Frames with magnetic backboards feature a permanent magnetic base mounted to the wall, onto which a matching front frame snaps. Magnetic rails or ledges use a top and bottom wooden or metal bar embedded with magnets to clamp the print, suspending it from a single cord.
Evaluate the Wall Surface
In Singapore, residential walls are typically either solid concrete (common for structural and external walls in HDB flats and condos) or drywall partition walls (often used to divide bedrooms or study areas).
- Concrete Walls: These surfaces are highly durable but require a masonry drill and wall plugs if you plan to install permanent screws. Standard nails will bend or chip the plaster.
- Drywall: Drywall is much softer and requires specialized hollow-wall anchors to distribute weight safely. Standard screws driven directly into drywall without an anchor will pull out under the weight of heavier frames.
- Freshly Painted Walls: If your walls have been painted recently, you must wait at least 28 days for the paint to cure fully before applying any adhesive hangers. Applying adhesives to uncured paint will lead to bond failure and torn paint when removed.
Explore Damage-Free Adhesives
For lightweight acrylic frames or magnetic rail systems, heavy-duty adhesive picture-hanging strips are an excellent choice. These strips allow you to mount frames without drilling, which is ideal for tenants or those who prefer a damage-free finish. When using adhesives, always check the manufacturer’s weight limits. A typical set of medium adhesive strips might support up to 5.4 kg, while large strips can support up to 7.2 kg. Ensure the combined weight of your frame and print does not exceed these specifications.
Consider Traditional Hardware
For heavier, oversized acrylic sandwich frames, traditional mounting hardware is more secure. Small picture hooks with hardened steel nails work well on drywall, while plastic wall anchors paired with stainless steel screws are necessary for concrete.
Safety Warning: Before drilling or driving nails into any wall, always use a reliable stud finder with live-wire and metal detection to check for hidden electrical conduits or plumbing lines.
Introduce Alternative Systems
If you want the freedom to swap and rearrange frames frequently without repeatedly mounting hardware, consider installing a magnetic picture rail or a shallow picture ledge. This allows you to rest your frames on a stable platform or hang them from adjustable steel cables, offering maximum flexibility with minimal wall impact.
Step-by-Step Guide to Hanging Your Magnetic Frames
Once you have finalized your layout and chosen your mounting hardware, follow this systematic process to install your magnetic photo frames safely and accurately.
Step 1: Gather Tools and Materials
Before starting, assemble all necessary tools to ensure a smooth installation process:
- Tape measure and pencil
- Spirit level (bubble level or laser level)
- Microfiber cloth and isopropyl rubbing alcohol (for adhesive methods)
- Your chosen hanging hardware (adhesive strips, wall anchors, or picture hooks)
- A dust sheet or vacuum cleaner (if drilling concrete)
- Your magnetic photo frames and prints
Step 2: Prepare the Wall Surface
If you are using adhesive hanging strips, the wall surface must be pristine. Wipe the designated mounting areas thoroughly with a microfiber cloth dampened with isopropyl rubbing alcohol. Do not use standard household glass cleaners or prep wipes, as they often leave a slippery residue that prevents the adhesive from bonding. Allow the surface to dry completely for at least 10 minutes.
Step 3: Mark Positions Accurately
With your paper templates still taped to the wall, use a spirit level to verify that each template is perfectly horizontal and vertical. Lightly mark the top corners or the designated hanger location of each frame onto the wall using a pencil. If you are using adhesive strips, mark where the top edge of the frame will sit. If you are using hooks or anchors, measure the distance from the top of the frame to the hanging bracket on the back, and transfer this measurement downward from your top pencil line to mark the exact drilling or nailing point.
Step 4: Apply the Hanging Hardware
Depending on your chosen method, follow the appropriate application technique:
- For Adhesive Strips: Separate the strips and press them together until they click. Remove one green liner and press the strip firmly onto the back of the frame. Repeat for the required number of strips, spacing them evenly near the top and sides of the frame. Remove the remaining liners, align the frame with your pencil marks, and press the frame firmly against the wall for 30 seconds. To ensure a strong bond, temporarily remove the frame from the wall by lifting it gently from the bottom, leaving the wall-side strips in place. Press those wall strips firmly with your fingers for another 30 seconds, then wait at least one hour for the adhesive to cure before reattaching the frame.
- For Drilled Anchors: If mounting on concrete, fit your drill with a masonry bit matching the diameter of your wall plug. Hold a vacuum nozzle directly underneath the drilling point to catch concrete dust. Drill to the depth recommended by the anchor manufacturer, insert the plastic wall plug until it sits flush with the plaster, and drive the screw in, leaving a small portion of the screw head exposed to catch the frame's mounting bracket.
Step 5: Mount and Adjust
Carefully align your magnetic frames with the installed hardware. If using adhesive strips, press the frame back onto the wall strips until they click securely into place. If using screws, hang the frame bracket over the screw head. Place your spirit level on top of the frame to make final micro-adjustments. Once aligned, insert your photographs between the magnetic layers of the frames, ensuring the edges align perfectly and the magnetic seal is tight.
Stop and Consult: If you encounter unexpected resistance while drilling, if the wall material crumbles or seems hollow in an unusual way, or if your adhesive strips fail to stick despite proper cleaning, stop immediately. Do not force the installation. Consult a qualified professional handyman or contact the hardware manufacturer for advice on specialized fasteners.
Style Your Display for a Cohesive and Curated Look
An exceptional gallery wall is defined by its curation. To elevate your display from a simple collection of pictures to a cohesive design feature, consider how your images and frames interact with the surrounding room.
Curate Your Photo Selection
Create visual harmony by selecting a consistent color palette or theme for your prints. For a sophisticated look, convert all your photographs to high-contrast black-and-white. If you prefer color, ensure the dominant tones in the images complement your room’s existing soft furnishings, such as rugs, cushions, or curtains. Mix different photographic subjects—such as close-up portraits, wide landscapes, and abstract textures—to keep the display engaging. Ensure your prints are produced at a high resolution; the clear acrylic of magnetic frames can magnify minor printing flaws or pixelation.
Manage Visual Weight and Spacing
Visual weight refers to how much attention an element attracts. Larger frames, darker photos, and busy compositions have more visual weight. To keep your gallery wall balanced, place heavier elements toward the bottom or the center of your layout, and surround them with lighter, smaller frames. Maintain a strict, consistent gap between all frames—usually between 5 cm and 10 cm. Consistent spacing acts as an invisible grid that binds the diverse elements together.
Incorporate Negative Space
Do not feel pressured to fill every square centimeter of your wall. Allowing the wall color to breathe around the perimeter of your gallery wall frames the entire display, preventing it from overwhelming the room. If your wall is painted a deep, dramatic color, the transparent edges of acrylic magnetic frames will allow that color to show through, creating a beautiful floating effect.
Mix Textures and Dimensions
While magnetic acrylic frames offer a sleek, minimalist aesthetic, you can add depth by mixing them with other decorative elements. Consider pairing your frames with a small floating shelf displaying a trailing indoor plant, or introduce a woven textile hanging nearby to soften the hard edges of the acrylic. To highlight your display, consider installing directional lighting, such as a track light system or adjustable surface-mounted spotlights. Ensure any lighting fixtures are installed in compliance with local electrical safety standards, keeping heat-generating bulbs away from sensitive acrylic and photographic prints.
Maintain, Clean, and Safely Remove Your Frames
To preserve the pristine appearance of your gallery wall and protect your cherished photographs, follow these maintenance and removal guidelines.
Clean Acrylic and Magnetic Surfaces
Acrylic is highly susceptible to scratching and clouding if cleaned with improper materials. Dust your frames weekly using a clean, dry, high-quality microfiber cloth. For deeper cleaning, use a specialized acrylic cleaner or a mild solution of dish soap and warm water applied with a damp cloth. Never use glass cleaners, ammonia-based sprays, or abrasive paper towels, as these will permanently scratch the surface and cause the acrylic to turn yellow or cloudy over time.
Protect Prints from Humidity
Singapore’s tropical, high-humidity climate can cause moisture to trap inside tightly sealed frames, leading to mold growth or photos sticking to the acrylic. Ensure your prints are completely dry before framing. When assembling your magnetic frames, make sure the magnetic seal is completely clean and tight to prevent dust and airborne moisture from entering the sandwich layer. Avoid hanging your gallery wall directly opposite air conditioning vents or in areas prone to dampness, such as directly outside a bathroom door.
Safe Removal of Adhesive Strips
If you decide to relocate your gallery wall, removing adhesive strips incorrectly can tear the paint and plaster off your walls. To remove them safely, never pull the strip outward or away from the wall. Instead, hold the frame gently and slide it upward to detach it from the wall-side strips. Grip the exposed tab of the wall strip and pull it straight down, keeping your hand flush against the wall. Stretch the strip slowly and steadily—up to 30 cm—until the adhesive releases cleanly from the wall surface.
Frequently Asked Questions (FAQ)
Can magnetic photo frames damage my walls?
Whether magnetic photo frames damage your walls depends entirely on the mounting method you choose rather than the frames themselves. High-quality adhesive picture-hanging strips are designed to peel away cleanly without leaving sticky residue or lifting paint, provided you follow the correct removal techniques. If you use traditional nails or wall anchors on concrete or drywall, they will leave small holes that require patching and painting to repair when the frames are removed.
How do I prevent acrylic magnetic frames from slipping or falling?
To prevent acrylic magnetic frames from slipping, you must match the weight rating of your hanging hardware to the combined weight of the acrylic panels, magnets, and the photo itself. Acrylic is denser and heavier than standard glass-and-wood frames, so always weigh your assembled frame before selecting adhesives. Additionally, ensure the wall surface is thoroughly cleaned with isopropyl rubbing alcohol to remove oils, and allow the adhesive strips to cure for at least one hour without any load before hanging the frame.
Community discussion
Share your experience or ask a question. Comments are reviewed before publication.