
Creating a balanced gallery wall is one of the most effective ways to transform an empty room into a deeply personal statement. Whether you are showcasing family portraits, travel photography, or abstract prints, a well-executed arrangement of photo frames acts as a striking focal point that anchors your entire interior design. However, hanging multiple frames can quickly become overwhelming without a systematic approach, often resulting in uneven spacing, unnecessary holes in your walls, and a cluttered visual effect.
Achieving a balanced gallery wall display requires a thoughtful combination of spatial planning, appropriate hardware selection, and precise installation techniques. By understanding how to curate your wall art decor, measure distances accurately, and secure frames safely according to your specific wall type, you can create a professional-grade display that remains secure for years to come. This guide walks you through every stage of the process, from initial layout concepts to the final styling adjustments.
Planning Your Gallery Wall Layout
Before picking up a hammer or drill, you must establish the physical boundaries and the primary focal point of your display. A gallery wall should not float aimlessly on a massive blank surface; instead, it should relate directly to the furniture beneath or around it. Centering your arrangement above a major furniture piece—such as a sofa, a bed, or a console table—helps ground the display and integrates it into the room’s broader layout. As a general rule of thumb, the overall width of your frame grouping should span approximately two-thirds to three-quarters of the width of the furniture below it to maintain a pleasing proportion.
Products mentioned in this guide
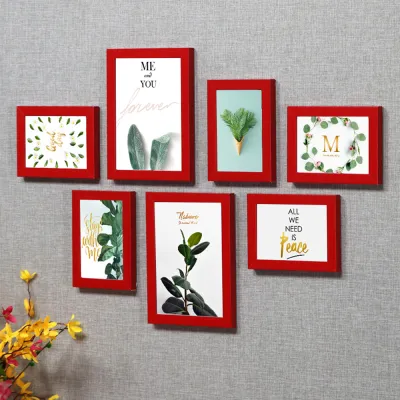
Prices are valid at publication and may change. Please refer to the product page for the latest price.
Once you have defined the boundaries, select a layout style that complements both your interior architecture and your personal aesthetic. A structured grid layout, featuring identical frames arranged in perfect rows and columns, offers a clean, symmetrical, and modern look that works exceptionally well in formal dining rooms or minimalist living spaces. Conversely, a salon-style eclectic cluster allows for a more relaxed, organic vibe by mixing different frame sizes, orientations, and materials around a central piece. For narrow spaces like hallways or staircases, a linear horizontal or diagonal row provides a streamlined path that guides the eye naturally through the transition zone.
To prevent an eclectic arrangement from feeling chaotic, introduce at least one unifying element that ties your wall art decor together. You might choose matching frame colors, such as all matte black or all natural oak, to establish a sense of order. Alternatively, you can use consistent matting widths and colors across different frame styles, or curate the artwork itself to follow a cohesive color palette, such as black-and-white photography or muted botanical prints. This visual thread ensures that even highly diverse collections feel intentional and harmonious.
To avoid the frustration of making incorrect holes in your walls, always test your arrangement in a low-risk environment first. Lay your photo frames flat on the floor in front of the target wall, adjusting their positions and spacing until you achieve a satisfying balance of visual weight. Once you are happy with the floor layout, trace each frame onto paper, cut out the templates, and label them with the corresponding frame’s orientation. Use low-tack painter’s tape to stick these paper templates to the wall, allowing you to step back and preview the entire composition, adjust the heights, and verify the spacing from multiple angles before committing to any hardware installation.
Selecting the Right Hanging Hardware for Local Wall Types
A successful gallery wall must be structurally secure, which requires matching your hanging hardware to both the weight of your frames and the specific material of your walls. In Singapore, residential construction typically features solid concrete or structural brick walls, particularly in Housing & Development Board (HDB) flats and modern condominiums. These dense, solid surfaces require a completely different mounting approach than the hollow drywall or gypsum partition walls commonly found in office spaces or newer home extensions.

For lightweight frames—typically those under 1.5 kilograms—high-quality adhesive hanging strips offer a convenient, drill-free solution on smooth, painted surfaces. However, local humidity levels can occasionally affect the bond strength of adhesives over time, so it is crucial to clean the wall surface thoroughly and follow the manufacturer’s application instructions precisely. For medium-weight frames mounted on solid concrete walls, you will need to use a rotary hammer drill equipped with a masonry drill bit to insert plastic wall plugs (also known as rawlplugs) and matching masonry screws. If you are working with drywall or partition walls, lightweight frames can be hung using specialized drywall hooks, while heavier pieces require heavy-duty toggle bolts or expanding hollow-wall anchors that grip the back of the plasterboard securely.
Safety must always be your primary consideration when planning your hardware strategy. Always check the maximum weight limit specified on your adhesive or hardware packaging, and factor in the weight of both the frame and the glass cover. Never rely solely on adhesive strips for heavy glass-fronted frames, oversized wooden frames, or any pieces positioned directly above beds, sofas, or high-traffic seating areas. For these high-risk zones, mechanical fasteners like screws and wall plugs are essential to prevent accidental falls and potential injuries. If you are uncertain about the load-bearing capacity of your wall or the weight of your frame, stop and consult the frame manufacturer or a qualified professional installer.
Step-by-Step Guide to Measuring and Hanging
With your paper templates taped to the wall and your hardware selected, you are ready to begin the physical installation. Following a systematic, step-by-step process ensures that your frames hang straight, remain evenly spaced, and sit at the perfect height for comfortable viewing.
Step 1: Establish the Center Point and Baseline Height Begin by finding the horizontal center of your designated wall space or the furniture piece below. Mark this center point lightly with a pencil. Next, determine the vertical center of your gallery wall arrangement. The standard museum and gallery height places the center of the artwork at eye level, which is typically between 145 and 150 centimeters from the floor. If you are hanging the gallery above a sofa or console, ensure there is a clearance of at least 15 to 20 centimeters between the bottom of the lowest frame and the top of the furniture to prevent accidental bumps.
Step 2: Measure and Mark with Precision Using your paper templates as a guide, measure the exact distance from the top of each frame to its hanging hardware (such as the D-ring, hanging wire, or sawtooth hanger). Transfer this measurement onto your paper templates on the wall, marking the exact spot where the screw or hook will sit. Maintain a consistent spacing of 5 to 8 centimeters between all frames to ensure the layout feels cohesive rather than disjointed. Double-check all measurements with a tape measure before proceeding to the next step.
Step 3: Prepare the Wall and Install Hardware Prepare your mounting points based on your wall type. If you are installing adhesive strips, wipe the wall area with rubbing alcohol, let it dry completely, and apply the strips according to the package directions, pressing firmly for the recommended duration. For concrete walls, put on safety glasses, select a masonry drill bit that matches the size of your plastic wall plugs, and drill straight into your pencil marks. Gently tap the wall plugs into the holes until they are flush with the wall surface, then drive the screws in, leaving a few millimeters protruding to catch the frame’s hardware.
Safety Warning: When drilling into any wall, always check for concealed utilities. Avoid drilling directly above, below, or in line with electrical outlets, light switches, or water pipes to prevent hitting hidden wiring or plumbing. If you suspect wiring is nearby, isolate the power at the main distribution board before drilling, or hire a qualified professional to complete the installation.
Step 4: Hang and Level the Frames Carefully mount your photo frames onto the installed hooks or screws. Place a spirit level on the top edge of each frame to verify that it is perfectly horizontal. If a frame is slightly tilted, adjust the hanging wire or add small adhesive rubber bumpers to the bottom corners of the frame’s back; these bumpers not only help keep the frame level but also prevent it from scuffing your paint and allow air to circulate behind the artwork, which is particularly beneficial in humid climates.
Final Adjustments and Styling Your Wall Art Decor
Once all your frames are on the wall, take a few steps back to evaluate the entire composition from a distance. Even with precise measurements, differences in the visual weight of your images—such as a dark, high-contrast photograph versus a light, airy watercolor—can make the arrangement feel unbalanced. If one side of your gallery wall feels visually heavier, try swapping the positions of a few frames or adjusting the inner artwork to redistribute the darker tones and thicker frames more evenly across the layout.
To elevate your gallery wall from a simple collection of photos to a dynamic piece of wall art decor, consider incorporating non-photo elements into the mix. Integrating small decorative mirrors, architectural carvings, wall sconces, or narrow floating shelves adds depth, texture, and a three-dimensional quality to the display. These elements break up the clean lines of the frames and allow you to showcase small three-dimensional objects, such as travel souvenirs or air plants, creating a more personalized and curated narrative.
Proper lighting is the final touch that brings your gallery wall to life. Ensure your display is well-lit to highlight the details of your prints, but avoid placing your frames in direct, harsh sunlight, as ultraviolet rays can cause photographs and artwork to fade over time. If you decide to install dedicated picture lights or adjustable track lighting, verify the fixture’s voltage, base interface, wattage limits, and electrical certification (such as the local Safety Mark) before purchase. For any lighting installations involving fixed electrical wiring or working at heights, always isolate the power supply and engage a licensed electrical worker or qualified professional to ensure a safe and compliant setup.
Frequently Asked Questions (FAQ)
How do I hang photo frames in a rental apartment without damaging the walls?
To hang photo frames in a rental property without risking your security deposit, rely on high-quality, damage-free adhesive hanging strips. Always check the manufacturer’s weight limits and use the appropriate number of strips for each frame’s weight. When it is time to move out, remove the strips correctly by pulling the exposed tab straight down, parallel to the wall surface, rather than pulling it outward toward you. This stretching action releases the adhesive cleanly without peeling off the paint or damaging the underlying plaster.
What is the best way to clean glass photo frames on a gallery wall?
To clean the glass on your gallery wall safely, use a clean, dry microfiber cloth and a gentle, ammonia-free glass cleaner. Never spray the cleaning solution directly onto the frame’s glass, as the liquid can run down the pane, seep under the edges of the frame, and cause permanent water damage or mold growth on your photographs and matting. Instead, spray a small amount of cleaner directly onto the microfiber cloth until it is slightly damp, then gently wipe the glass surface in a circular motion.
Community discussion
Share your experience or ask a question. Comments are reviewed before publication.