
Quick Guide to Selecting Solar Grow Lights
Finding a reliable solar plant grow light in Singapore requires balancing the tropical climate with the specific light requirements of your plants. Solar-powered grow lights offer an energy-efficient, wire-free solution for outdoor gardens, balconies, and patios. However, they are best used as supplemental lighting rather than a complete replacement for natural sunlight.
Because Singapore experiences sudden, heavy downpours and prolonged monsoon seasons, verifying weatherproofing certifications is the single most critical step before purchasing any outdoor lighting fixture. Additionally, buyers must understand the direct relationship between solar panel surface area and the duration of the light output. A small, integrated panel will rarely generate enough power to run high-intensity grow diodes for more than a few hours. To make a successful purchase, you must evaluate the physical placement of your setup, the specific light spectrum your plants need, and the durability of the housing materials.
Understanding Solar Grow Light Limitations and Use Cases
To get the most out of a solar plant grow light, you must align your expectations with the physical realities of solar power. Solar-powered fixtures harvest ambient sunlight through photovoltaic cells, convert it into electrical energy, and store it in an internal battery to power light-emitting diodes (LEDs) later. This process is highly dependent on the amount of direct sunlight the solar panel receives during the day. Consequently, these systems are highly effective as supplemental light sources for shaded balconies, high-rise corridors, or patio corners that receive only partial sun. They help bridge the gap for plants that need just a few more hours of light to thrive.
Products mentioned in this guide
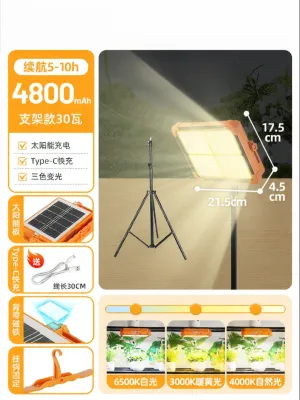
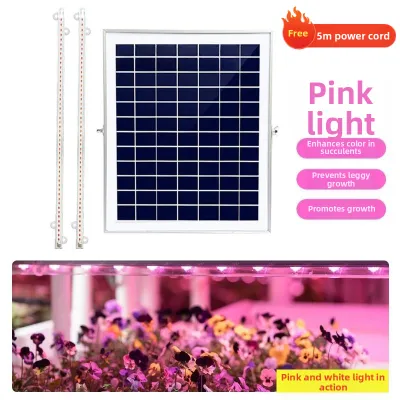
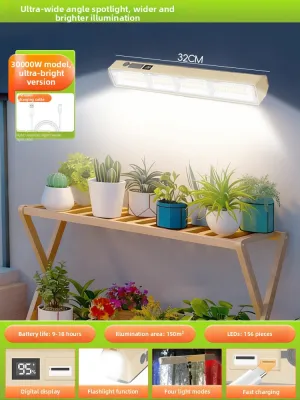
Prices are valid at publication and may change. Please refer to the product page for the latest price.

Conversely, solar grow lights are generally unsuitable as the primary light source for dense indoor canopies or light-hungry, fruiting crops like tomatoes, chili peppers, or melons. These demanding plants require high-intensity, continuous light that standard solar-powered batteries cannot sustain overnight. To support such crops purely on solar power, you would need an industrial-sized solar panel array and a massive battery bank, which is impractical for typical residential balconies or small gardens.
For residential growers, the ideal candidates for solar-supplemented lighting are shade-tolerant foliage plants, leafy herbs, and young seedlings. Plants such as mint, basil, pothos, ferns, and various microgreens respond exceptionally well to the moderate, steady light levels provided by consumer-grade solar fixtures. By using these lights to extend the daylight hours on a north-facing balcony or a covered patio, you can prevent your plants from becoming leggy and weak without increasing your household electricity bill.
Essential Specifications to Evaluate
When comparing different solar grow light models on online marketplaces, it is easy to get lost in marketing jargon. To make an objective decision, you should focus on three main pillars of evaluation: light output quality, power storage capacity, and physical durability. Understanding these specifications allows you to filter out low-quality options and select a fixture that will actually benefit your plants while surviving the elements.
Light Spectrum and Intensity Requirements
Plants do not perceive light the same way humans do. While standard outdoor solar spotlights are designed to illuminate pathways with bright white or warm yellow light, grow lights must emit wavelengths that stimulate photosynthesis. Look for fixtures that offer a full-spectrum output, which typically includes a blend of blue wavelengths (around 450 nanometers) to promote vegetative leaf growth and red wavelengths (around 660 nanometers) to encourage flowering and root development. Some advanced models allow you to switch between these spectrums depending on the growth stage of your plants.
When evaluating light intensity, avoid relying solely on standard lumen ratings. Lumens measure brightness as perceived by the human eye, whereas plants require photosynthetically active radiation (PAR). Reliable manufacturers will often provide PAR values or Photosynthetic Photon Flux Density (PPFD) measurements at specific distances. Because light intensity drops off dramatically as the distance between the diode and the plant increases, you must choose a fixture that can be positioned close to the plant canopy—often within 15 to 30 centimeters—without burning the foliage.
Battery Capacity and Solar Panel Efficiency
The performance of your solar plant grow light is directly limited by its power system. The solar panel’s wattage determines how quickly it can charge the battery, while the battery’s capacity (measured in milliampere-hours, or mAh) determines how long the light can run. In Singapore, frequent cloud cover and sudden afternoon storms can significantly reduce the amount of direct sunlight available for charging. Therefore, choosing a highly efficient monocrystalline solar panel is crucial, as these panels perform better in low-light and overcast conditions compared to cheaper polycrystalline alternatives.
To ensure the light runs reliably through the evening, look for a battery capacity that matches the power draw of the LEDs. A high-wattage light paired with a small battery will deplete its charge within an hour or two. To manage this energy balance, prioritize models equipped with adjustable timers, motion sensors, or auto-dimming features. These functions allow the light to operate at full brightness during key evening hours and then dim down or turn off automatically, conserving stored energy for the next day.
Weather Resistance and Build Quality
Because these lights are intended for outdoor or semi-outdoor environments, they must be built to withstand harsh tropical conditions. The standard method for verifying environmental durability is the Ingress Protection (IP) rating. For a solar grow light placed in an exposed garden bed or an open balcony, look for a minimum rating of IP65, which indicates complete protection against dust and resistance to low-pressure water jets from any direction. If the light will be placed in an area prone to temporary pooling or severe wind-driven rain, an IP67 rating is highly recommended.
Material selection is equally important for longevity. The housing should be constructed from UV-stabilized plastics or rust-proof metals, such as anodized aluminum or marine-grade stainless steel. Cheap, non-UV-treated plastics will quickly degrade, become brittle, and crack under Singapore’s intense tropical sun, allowing moisture to penetrate the internal electronics. Always avoid using indoor-rated solar or plug-in lights in any area exposed to wind, rain, or high humidity, as this poses a severe electrical hazard and will lead to premature product failure.
Installation and Placement Strategies for Optimal Sunlight
Achieving success with solar grow lights depends heavily on how and where you install the components. Unlike integrated solar path lights, where the panel and the light bulb are housed in a single unit, the most effective solar grow lights utilize a split-type design. This configuration connects the solar panel to the light fixture via a long, weatherproof cable. This separation is incredibly beneficial for balcony and patio gardeners, as it allows you to mount the solar panel high up on an exterior railing or wall where it can catch direct sunlight, while routing the actual grow light indoors or deep under a shaded canopy where your plants are located.
When positioning the solar panel, you must consider Singapore’s geographical location near the equator. Because the sun passes almost directly overhead throughout the year, solar panels should be installed relatively flat, with only a slight tilt of approximately 5 to 15 degrees. This minimal tilt is not just for solar tracking; it is essential for allowing rainwater to run off the surface naturally, washing away accumulated dust and debris. Orienting the panel slightly toward the south or north, depending on the seasonal tilt of the sun, can also help maximize daily energy harvest. Ensure that nearby structures, air conditioning ledges, or overhanging foliage do not cast shadows on the panel during peak daylight hours, as even partial shading can drastically reduce charging efficiency.
Cable management is another critical aspect of installation that is often overlooked. When routing the connecting cable from an outdoor panel to a semi-outdoor or indoor light fixture, ensure the wire is secured tightly along walls or railings using UV-resistant cable ties. Avoid laying cables across wet garden paths, balcony floors, or high-traffic areas where they present a tripping hazard or can be damaged by foot traffic and sliding doors. Create a “drip loop”—a small downward curve in the cable right before it enters the light fixture or passes through a window frame—to prevent rainwater from tracking along the wire and entering the electrical connections.
Building Your Shortlist: What to Look for on Product Labels
When browsing online marketplaces or local garden centers, you will encounter hundreds of generic solar lights marketed as grow lights. To protect your investment, you must learn to read product labels critically and identify common red flags. One of the most frequent issues is the presence of unrealistic performance claims. If a small, inexpensive solar light claims to output thousands of lumens or provide professional-grade PAR values while utilizing a tiny solar panel, it is highly likely to be an exaggeration. Compare the physical size of the solar panel to the advertised light output; a high-output LED array requires a correspondingly large panel to function effectively.
Another major red flag is the absence of clear weatherproofing certifications or safety labels. Reliable products will clearly state their IP rating on the packaging or in the technical specifications sheet. Avoid unbranded, generic fixtures that lack these ratings, as they are prone to water ingress and short-circuiting within a few weeks of exposure to high humidity. Additionally, check if the manufacturer provides a clear warranty policy and whether they offer replacement parts. Because rechargeable batteries naturally degrade over time, choosing a model with a user-replaceable battery compartment will significantly extend the overall lifespan of your fixture.
When compiling your shortlist, look for products that explicitly state the battery chemistry used. Lithium Iron Phosphate (LiFePO4) batteries are highly preferred for solar applications due to their superior thermal stability, safety, and long cycle life compared to standard Lithium-ion or older Nickel-Metal Hydride (NiMH) batteries. While fixtures utilizing LiFePO4 technology may carry a slightly higher upfront cost, they represent a much safer and more cost-effective choice over the long term, especially in Singapore’s warm climate.
Maintenance and Troubleshooting Common Issues
To keep your solar grow lights operating at peak efficiency, you must establish a simple, routine maintenance schedule. Over time, a fine layer of dust, pollen, and hard water spots from rain or watering cans will accumulate on the surface of the solar panel. This residue blocks sunlight and can reduce charging efficiency by a significant margin. Once every two to three weeks, gently wipe down the solar panel with a soft, damp microfiber cloth and a mild, pH-neutral soap. Avoid using abrasive scrubbers, harsh chemical cleaners, or high-pressure water sprays, as these can scratch the protective tempered glass or damage the weather seals.
Another essential maintenance task is monitoring the health of the rechargeable battery. Most solar light batteries will perform reliably for one to two years before their capacity begins to decline. If you notice that your grow lights are turning off much earlier in the evening than they used to, despite receiving a full day of clear sunlight, the battery is likely reaching the end of its lifecycle. To replace it, isolate the power by turning off the fixture, open the battery compartment according to the manufacturer’s instructions, and replace the old cell with a new one of the exact same voltage, chemistry, and capacity rating. Always ensure the rubber gasket sealing the battery compartment is properly seated before reassembling the unit to maintain its water resistance.
If your light fails to turn on entirely, follow a systematic troubleshooting process before discarding the unit. First, verify that the solar panel is clean and positioned in an area that receives unobstructed sunlight. Next, check all cable connections between the panel and the light fixture to ensure they are tight and free of moisture or corrosion. Many solar lights feature a built-in light sensor that prevents the LEDs from turning on when ambient light is detected; test the fixture in a completely dark room or cover the solar panel with a dark cloth to see if the light activates. If the light still fails to function, inspect the power switch for signs of water damage or wear, and consult the manufacturer’s manual for specific diagnostic steps.
Frequently Asked Questions (FAQ)
Can solar grow lights sustain heavy-feeding plants indoors?
No, standard consumer-grade solar grow lights are generally unable to sustain heavy-feeding, high-light plants indoors. The energy harvested by a typical residential-sized solar panel is insufficient to power the high-intensity LEDs required for fruiting, flowering, or dense indoor cultivation over long periods. For indoor grow tents or rooms lacking direct sunlight, grid-powered LED grow lights are the necessary and reliable alternative, as they provide the continuous, high-output intensity required to support demanding crops.
How long do the batteries in solar grow lights typically last?
The lifespan of the batteries in solar grow lights depends heavily on the battery chemistry and usage patterns. Standard Lithium-ion and Nickel-Metal Hydride (NiMH) batteries typically last between one and two years, or roughly 300 to 500 charge-discharge cycles, before experiencing a noticeable drop in capacity. High-quality Lithium Iron Phosphate (LiFePO4) batteries can last significantly longer, often providing over 1,000 to 2,000 cycles. Before purchasing, always check if the battery compartment is user-replaceable so you can swap out degraded cells without replacing the entire fixture.
Community discussion
Share your experience or ask a question. Comments are reviewed before publication.