
Creating a seamless, continuous run of light under kitchen cabinets, inside wardrobes, or along cove ceilings is a highly effective way to eliminate dark spots and elevate the ambiance of a room. For these applications, T5 LED integrated battens are an exceptionally popular choice due to their slim profile, energy efficiency, and modular design. To connect these fixtures in a continuous line—a process known as daisy-chaining—you must use a dedicated t5 light connector. This specialized accessory allows electrical current to flow safely from one fixture to the next, eliminating the need to run separate power cables from each individual light back to a wall outlet or junction box.
These connectors generally come in two primary forms: rigid butt-connectors and flexible jumper cables. Rigid connectors join two T5 tubes end-to-end with virtually no gap, creating a single, unbroken line of light that is perfect for long, straight runs. Flexible jumper cables, on the other hand, feature a short length of insulated wire between the terminal plugs, allowing you to navigate corners, bypass structural obstacles, or space the fixtures slightly apart. Understanding how to select, install, and secure these connectors is essential for achieving a professional-grade installation that is both visually polished and electrically sound.
Preparation and Electrical Safety Boundaries
Before handling any electrical components or mounting hardware, you must establish a safe working environment. The absolute first step of any lighting project is to isolate the electrical circuit you will be working on. Go to your property’s main consumer unit (distribution board) and switch off the circuit breaker dedicated to the lighting loop or the specific wall outlets you plan to use. Do not rely solely on the wall switch to cut the power, as some wiring configurations may leave live current at the fixture even when the switch is in the “off” position. Use a reliable non-contact voltage tester at the wire ends or outlet to confirm that the circuit is completely dead before proceeding.
Products mentioned in this guide
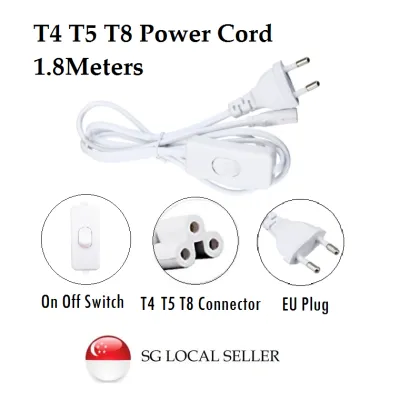
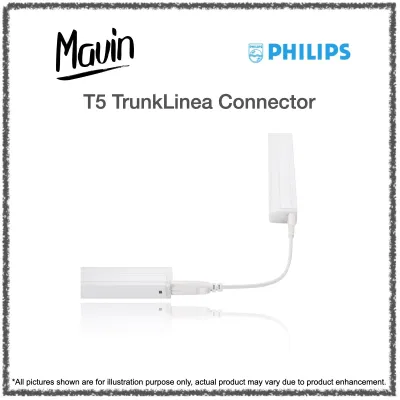

Prices are valid at publication and may change. Please refer to the product page for the latest price.
Next, you must verify the electrical limits of your specific T5 LED fixtures. Daisy-chaining does not allow for an infinite sequence of lights; the internal wiring and drivers of the first fixture in the chain must carry the electrical load for all subsequent units. Exceeding the manufacturer’s specified limits can lead to overheating, melted plastic casing, premature driver failure, or even an electrical fire. Look closely at the manufacturer’s label or instruction manual to find the maximum allowable wattage, amperage, or maximum number of linkable units. For example, if a manufacturer specifies a maximum daisy-chain limit of 100 watts, and you are using 12-watt T5 LED tubes, you must never connect more than eight fixtures in a single continuous run.
Physical and electrical compatibility is another critical boundary. T5 LED fixtures are not universally standardized across different brands. While they may all share the “T5” designation—which refers to the tube’s 5/8-inch diameter—the connection ports at the ends of integrated battens vary widely. Some brands use proprietary two-pin configurations, while others use three-pin designs that include a dedicated ground connection. Ensure that your t5 light connector is explicitly approved by the manufacturer of your specific LED battens. Attempting to force a mismatched connector into a port can damage the delicate brass pins inside, leading to poor electrical contact or short circuits.
Finally, evaluate the physical environment where the lights will be installed. Singapore’s tropical climate brings consistently high relative humidity, which can accelerate the degradation of exposed electrical contacts. Standard T5 link connectors and integrated battens are typically rated IP20, meaning they are designed strictly for dry, indoor environments. If you plan to install under-cabinet lighting directly above a kitchen sink, near a stove where steam accumulates, or in a semi-outdoor service yard, standard connectors are not safe. For these damp zones, you must select fixtures and connectors that carry a higher ingress protection rating, such as IP44 or IP65, to prevent moisture from penetrating the electrical connections and causing a ground fault.
Tools and Materials Checklist
Having the correct tools and materials on hand before starting ensures a smooth, efficient installation process. First, compile the primary lighting components: your T5 LED integrated battens and the corresponding manufacturer-approved t5 light connectors. Ensure you have a mix of rigid butt-connectors for straight runs and flexible jumper cables if your layout requires navigating corners or tight angles.

For mounting, you will need the metal or plastic mounting clips that typically come packaged with the T5 fixtures, along with appropriate screws and wall anchors. The type of mounting hardware you use must match the substrate of your installation surface. For instance, mounting lights under wooden kitchen cabinets requires short wood screws that will not pierce through the bottom shelf. Conversely, if you are mounting the fixtures directly onto concrete walls or ceilings—a common structural feature in Singapore’s HDB flats and condominiums—you will need masonry wall plugs (anchors) and a hammer drill to secure the clips.
Gather your basic hand tools to complete the assembly. You will need a measuring tape and a pencil to mark out the precise alignment of the fixtures, ensuring your continuous run is perfectly straight. A manual screwdriver is highly recommended over a high-torque power drill for tightening the mounting clip screws, as over-tightening can easily warp or crack the plastic clips. Lastly, keep your non-contact voltage tester nearby to perform safety checks throughout the installation.
Step-by-Step Installation Guide
Achieving a seamless, straight line of light requires a methodical approach to both physical mounting and electrical connection. By following a structured sequence, you can ensure that the fixtures are securely supported, the cables are neatly managed, and the electrical connections remain completely tension-free.
Mounting the First Fixture and Power Source
Begin by mapping out the exact path of your lighting run on the mounting surface. Use your measuring tape and pencil to mark the positions for the mounting clips of the first fixture. It is vital to use at least two clips per T5 tube to prevent sagging. If you are mounting under a cabinet, position the clips close to the front lip to hide the fixtures from direct view, or center them for even light distribution. Once marked, screw the mounting clips firmly into place, ensuring they are perfectly aligned.
Next, take the first T5 LED tube and gently snap it into the installed mounting clips. You should hear a distinct click, indicating that the fixture is securely held in place. Before proceeding to the next tube, you must establish the primary power source for this initial fixture. If your setup uses a simple plug-and-play power cord, route the cord from the nearest wall outlet to the input port on the first fixture, but do not plug it into the wall yet.
If your lighting design requires the system to be hardwired directly into a wall or ceiling junction box, you must observe local safety regulations. In Singapore, any fixed electrical wiring work must be carried out by a licensed electrical worker (LEW) registered with the Energy Market Authority (EMA). Attempting to hardwire fixtures yourself without a license violates local safety codes, risks voiding your home insurance, and poses severe electrocution and fire hazards. If you are using a standard three-pin plug into an existing socket, you can proceed as a DIY project, but keep the plug disconnected from the outlet for now.
Linking Additional T5 Tubes
With the first fixture securely mounted, you can begin extending the chain. Position the second T5 LED tube next to the first one, aligning them carefully. If you are using a rigid butt-connector for a gapless look, insert the connector firmly into the output port of the first fixture. Then, carefully slide the input port of the second fixture onto the exposed end of the connector. Push them together until the two fixtures are flush and the connector is fully seated.
Once the electrical connection is made, snap the second fixture into its own pre-installed mounting clips. It is critical that the mounting clips bear the entire physical weight of the second tube. Never allow a t5 light connector—whether rigid or a flexible cable—to support the weight of a fixture or experience any physical tension. Tension on the connector will gradually pull the internal pins apart, leading to intermittent electrical contact, arcing, and localized overheating.
If your layout requires navigating a corner, such as an L-shaped kitchen counter, use a flexible jumper cable instead of a rigid connector. Insert one end of the jumper cable into the first fixture’s output, mount the second fixture on the adjacent wall or cabinet surface, and plug the other end of the cable into the second fixture’s input. Repeat this linking process for all subsequent tubes in your design, making sure to count the total wattage to ensure you stay well below the manufacturer’s maximum daisy-chain limit.
Securing End Caps and Managing Cables
After mounting and linking the final T5 LED tube in your run, you will be left with an exposed, unused output port at the very end of the chain. This open port contains live electrical terminals when the system is powered. To prevent accidental contact, dust accumulation, or moisture ingress, you must insert a plastic protective end cap into this final port. Most T5 kits include these caps; if yours did not, obtain compatible caps from the manufacturer before turning on the power.
Next, address any loose or sagging cables along the run. If you used flexible jumper cables to navigate corners or space out your fixtures, use adhesive-backed cable clips or small zip ties to secure the excess wire flat against the mounting surface. Loose cables not only look untidy, but they also present a physical hazard. In a kitchen, a sagging cable can easily be snagged by a tall appliance or a hand, pulling the connectors out of their sockets and potentially damaging the fixtures. Ensure all cables are tucked neatly out of sight and held tautly but without placing pull-force on the connection ports.
Testing, Verification, and Troubleshooting
Once the physical installation is complete and all connections are secure, you can safely restore power to the circuit. Go back to your main consumer unit and switch the circuit breaker back to the “on” position. Plug the primary power cord into the wall outlet, or have your licensed electrician activate the hardwired circuit. Flip the wall switch to turn on your new T5 LED light run.
Observe the entire chain of lights carefully as they illuminate. All linked T5 tubes should turn on simultaneously and emit an even, consistent level of brightness. Walk along the installation and check for any signs of flickering, buzzing, or delayed startup in individual tubes. If the lights are functioning correctly, let them run for approximately five to ten minutes to settle.
If you encounter issues, systematically troubleshoot them while keeping safety at the forefront. If the final tube in your chain fails to light up, or if it is noticeably dimmer than the first tube, this is a classic symptom of an exceeded daisy-chain limit or an excessive voltage drop. It could also indicate that a t5 light connector is not fully seated in its port. Turn off the power at the breaker before adjusting any connections. If you detect flickering, it is often caused by a loose connection pin or compatibility issues with an external dimmer switch; standard T5 LED battens are typically non-dimmable unless explicitly labeled otherwise.
Conduct a physical heat check after the lights have been operating for a few minutes. Carefully place your hand near the connection points where the link connectors join the fixtures. The connectors should feel cool or only slightly warm to the touch. If any connector feels hot, or if you detect a burning plastic smell, switch off the power immediately at the circuit breaker. A hot connector indicates poor electrical contact, which creates high resistance and localized heating, or an electrical overload. Double-check that the connector is the correct model for your fixtures and is pushed completely into the port.
Frequently Asked Questions (FAQ)
Can I mix different brands of T5 LED tubes when daisy-chaining?
It is highly recommended that you never mix different brands or even different models from the same manufacturer when daisy-chaining T5 LED tubes. While many T5 integrated battens look identical from the outside, their internal electrical architectures can vary dramatically. Different manufacturers design their internal drivers to handle specific current limits, voltage ranges, and wiring configurations.
Using a t5 light connector to link mismatched brands can result in severe electrical hazards. The pin assignments inside the ports may not align, which can cause a direct short circuit the moment you turn on the power. Even if the pins physically fit and the lights turn on, differences in driver impedance can cause uneven power distribution, leading to rapid flickering, premature burnout of the LEDs, or permanent damage to the internal circuitry. Mixing brands will also immediately void the manufacturer’s warranty on all connected fixtures. To ensure safety and uniform light output, always use identical T5 models from a single manufacturer throughout the entire chain.
Do I need an electrician to install T5 link connectors?
Whether you need a professional electrician depends entirely on how the first fixture in your daisy-chain connects to your home’s electrical system. If your T5 LED setup is designed as a plug-and-play system—where the primary power cord simply plugs into an existing, standard three-pin wall socket—you do not need an electrician. Connecting the subsequent tubes using approved link connectors and mounting them to your cabinets is a safe and straightforward DIY task, provided you follow the manufacturer’s safety guidelines.
However, if your lighting design requires the first fixture to be hardwired directly into your home’s electrical mains, you must hire a licensed electrical worker (LEW) in Singapore. This includes scenarios where you are connecting the lights to a ceiling rose, an existing lighting circuit junction box, or running new concealed wiring behind walls. Under local regulations, performing fixed electrical wiring work without a license is illegal and highly dangerous. A licensed professional will ensure that the connection is properly fused, grounded, and compliant with the Singapore Standard SS 638, protecting your home from electrical faults and ensuring your insurance coverage remains valid.
Community discussion
Share your experience or ask a question. Comments are reviewed before publication.