
Replacing a faulty fluorescent lamp starter is a straightforward home maintenance task that can instantly resolve issues like flickering, delayed starting, or a complete failure to light up. The starter is a small, cylindrical component that acts as a timed switch, providing the initial high-voltage surge needed to ionize the gas inside the fluorescent tube. Over time, the internal contacts of the starter wear out, preventing the lamp from igniting properly. To replace it safely, you must isolate the electrical power, remove the fluorescent tube to access the starter socket, twist the old starter counterclockwise to release it, insert a compatible new starter, and twist it clockwise to lock it in place.
By understanding the mechanics of your light fixture and following a systematic, safety-first approach, you can complete this replacement in just a few minutes. This guide provides a step-by-step walkthrough to help you identify your fixture type, prepare your workspace safely, execute the replacement, and troubleshoot any lingering issues.
Identifying Your Fluorescent Fixture and Starter Type
Before purchasing a replacement starter, you must verify that your light fixture actually uses one. Not all fluorescent lights require an external starter. Older fixtures equipped with magnetic ballasts rely on a starter to preheat the tube’s filaments, whereas modern fixtures with electronic ballasts regulate the electrical current electronically and do not require a starter.
Products mentioned in this guide
![[Bundle of 5] Philips Fluorescent Tube Starter S10 S2-P](https://img.lazcdn.com/g/p/2c31ea873400d228ace600ad71aaddb4.png_400x400q80.png_.webp)

Prices are valid at publication and may change. Please refer to the product page for the latest price.
To locate the starter, look closely at the body of your fluorescent fixture. It is typically a small, cylindrical plastic or metal canister, roughly two to three centimeters in diameter, protruding from the casing near one end of the fluorescent tube. In some fixtures, the starter is positioned directly behind the tube, requiring you to remove the tube first to see it. If your fixture has a completely smooth casing with no visible cylindrical components or access ports, it likely utilizes an electronic ballast, meaning there is no starter to replace.
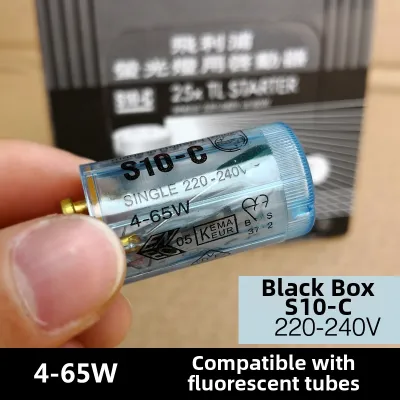
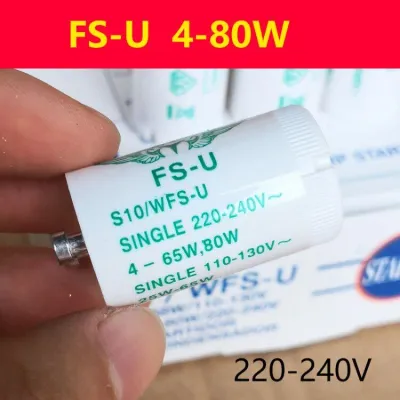
If you confirm your fixture has a starter, you must check its specifications to ensure compatibility. Look for the printed label on the side of the existing starter or on the fixture’s internal ballast. The label will indicate the wattage range, such as 4W to 22W or 4W to 80W, and the voltage rating. In Singapore, residential electrical systems operate at a nominal voltage of 230V, so your replacement starter must be rated for this voltage. Using a starter with an incorrect wattage or voltage rating can lead to premature failure of both the starter and the fluorescent tube, or prevent the light from turning on entirely.
Safety Preparations and Required Tools
Working with electrical fixtures requires strict adherence to safety protocols to prevent electrical shock or short circuits. Before touching any part of the light fixture, you must isolate the power supply. Simply turning off the wall switch is insufficient, as improper wiring or back-feeding can leave live current running to the fixture. Locate your home’s main distribution board and switch off the circuit breaker dedicated to the lighting circuit you are working on.

Once the circuit breaker is turned off, verify that the power is truly isolated. Use a reliable non-contact voltage tester near the fixture’s housing and connection points to confirm there is zero voltage present. This step is crucial, especially in older buildings where circuit labels on the distribution board might be inaccurate or outdated.
In addition to isolating the power, gather the necessary tools and safety equipment before starting. You will need a sturdy, slip-resistant step ladder to reach the fixture safely, particularly if it is mounted on a high ceiling. Avoid standing on chairs or unstable furniture. Wear insulated gloves to protect your hands from sharp metal edges on the fixture housing and to prevent transferring oils from your skin onto the glass fluorescent tube. Keep your replacement starter nearby, ensuring it matches the physical dimensions and pin configuration of the original unit. If you are working in a damp environment, such as a kitchen or bathroom, ensure the floor and your hands are completely dry before commencing any work.
Step-by-Step Starter Removal and Installation
With the power safely isolated and your tools ready, you can proceed to the physical replacement of the starter. The first step is to remove the fluorescent tube to gain unobstructed access to the starter socket. Hold the glass tube gently but firmly near both ends. Rotate the tube approximately 90 degrees in either direction until you feel the metal pins at the ends align with the vertical slots in the lamp holders, commonly referred to as tombstones. Carefully slide the tube downward and out of the holders, placing it in a safe, flat area where it cannot roll off or break.
Once the tube is removed, locate the cylindrical starter in its socket. To remove the old starter, press it slightly inward and twist it counterclockwise. The starter is equipped with two small metal pins at its base that lock into keyhole-shaped slots inside the socket. Twisting counterclockwise aligns the pins with the wider part of the slots, allowing the starter to slide out easily. Do not apply excessive force or yank the starter, as this can crack the plastic socket or damage the internal wiring of the fixture.
Take your new, compatible starter and align its two metal pins with the keyhole slots in the socket. Insert the starter into the socket and press it gently inward, then twist it clockwise until you feel it click or lock firmly into place. The starter should sit flush against the socket and feel secure.
After securing the new starter, you can reinstall the fluorescent tube. Lift the tube carefully and align the metal pins on both ends with the vertical slots in the tombstones. Slide the pins into the slots, then gently rotate the tube 90 degrees until it locks into place. You should feel a slight resistance or a subtle click, indicating that the tube is seated properly and making secure electrical contact. Ensure the tube is centered and even on both sides before releasing your grip.
Testing the Fixture and Troubleshooting Issues
Once the new starter and the tube are securely installed, you can restore power to the circuit. Return to your main distribution board and switch the lighting circuit breaker back to the “on” position. Flip the wall switch to turn on the light and observe the ignition sequence. A healthy magnetic fixture with a new starter will typically blink once or twice before illuminating fully and steadily.
If the light fails to turn on, or if you notice unusual behavior, turn off the wall switch immediately and begin troubleshooting. First, verify that the fluorescent tube is seated correctly in the tombstones. If the pins are slightly misaligned, the circuit will remain open, preventing the light from igniting. Try gently rotating the tube back and forth to ensure a solid connection.
If the tube is seated correctly but the light still flickers continuously without staying on, the fluorescent tube itself may be degraded. Inspect the ends of the tube near the metal caps; heavy black discoloration or dark rings indicate that the internal phosphors and filaments are worn out, and the tube needs to be replaced.
Be alert to warning signs that indicate deeper electrical issues. If you hear a loud, persistent humming or buzzing noise, or if you detect a burning smell coming from the fixture, turn off the power at the circuit breaker immediately. These symptoms point to a failing magnetic ballast or damaged internal wiring. In such cases, do not attempt further DIY repairs. Stop work and contact a licensed electrical worker or qualified professional to inspect and repair the fixture.
Evaluating Upgrades Versus Continued Maintenance
While replacing a starter is a cost-effective way to extend the life of an existing fluorescent fixture, it is worth considering whether continuing to maintain an older magnetic system is practical in the long run. Magnetic ballasts are inherently less energy-efficient than modern lighting technologies, and they tend to degrade over time, leading to frequent starter and tube failures.
If you find yourself replacing starters and tubes regularly, upgrading to light-emitting diode, or LED, technology may be a more sustainable and cost-effective solution. LED tubes consume significantly less electricity, turn on instantly without flickering, and have a much longer operational lifespan. They also eliminate the need for traditional starters and ballasts, reducing the number of potential failure points in your lighting system.
When considering an LED upgrade, you have two primary options: retrofitting your existing fixture or replacing the entire fixture. Some LED retrofit tubes are designed to work with existing magnetic fixtures and come packaged with a specialized LED starter or dummy starter, which is simply a fused link that completes the circuit. However, other LED retrofits require you to bypass the magnetic ballast entirely, which involves rewiring the fixture. In Singapore, any modifications to fixed electrical wiring must comply with local electrical safety regulations and should be carried out by a licensed electrician to ensure safety and compliance. Alternatively, replacing the entire old fixture with a modern, integrated LED batten light is often the simplest and safest path to a more reliable lighting setup.
Frequently Asked Questions (FAQ)
Can I use a higher wattage starter for my fluorescent light?
No, you should not use a starter with a wattage rating higher than what is specified for your fluorescent tube and fixture. Starters are designed to match the specific electrical characteristics of the tube to ensure safe preheating and ignition. Using a starter with an incorrect or excessively high wattage rating can cause the tube’s filaments to overheat, leading to premature tube failure, or it may fail to ignite the gas inside the tube altogether. Always check the labels on both the old starter and the fixture housing to select a replacement that matches the exact wattage range.
Why does my new starter keep failing after a few weeks?
If a newly installed starter fails within a short period, it is usually a symptom of an underlying issue within the fixture rather than a defective starter. An aging or degraded fluorescent tube requires more voltage to ignite, which puts excessive strain on the starter and causes it to burn out quickly. Alternatively, a failing magnetic ballast may be delivering unstable current, or the contacts inside the lamp holders may be corroded or loose. If replacing both the tube and the starter does not resolve the frequent failures, have a qualified electrician inspect the ballast and internal wiring.
Do LED tubes require a starter?
Standard LED tubes do not require traditional fluorescent starters because they do not rely on a high-voltage gas ignition process to produce light. However, if you are retrofitting an existing magnetic ballast fixture with a compatible LED tube, you may need to install a specialized LED starter, which is often included with the LED tube. This device is actually a dummy starter containing a safety fuse that completes the electrical circuit in place of the old starter. If you are installing a dedicated LED fixture or have bypassed the ballast, no starter of any kind is used.
Community discussion
Share your experience or ask a question. Comments are reviewed before publication.