
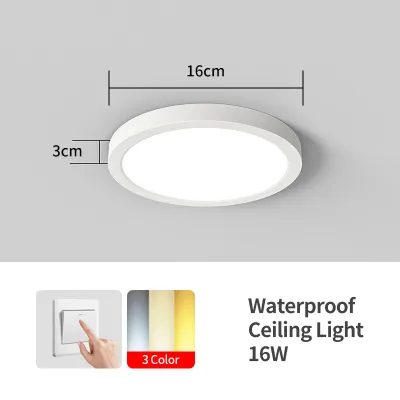
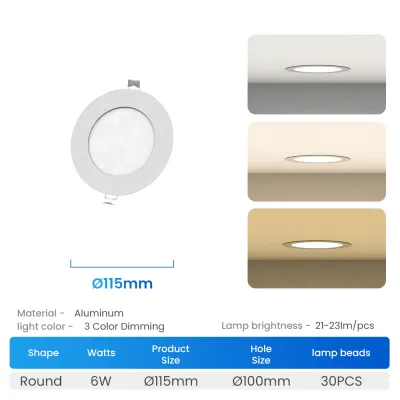
For a standard Housing & Development Board (HDB) flat with a 2.6-metre ceiling height, selecting the right light fixture requires balancing physical clearance with effective illumination. The most practical solution is an ultra-slim, flush-mount three-color light profile with a thickness of 5 centimetres or less. These low-profile designs sit tight against the concrete ceiling slab, preserving precious headroom while offering the versatility of three distinct color temperatures. By transitioning between daylight, cool white, and warm white, homeowners can easily adapt their living spaces to different times of day and activities without compromising the open, airy feel of their rooms.
Assessing Clearance and Visual Weight for 2.6m Ceilings
When dealing with a standard 2.6-metre ceiling, every centimetre of vertical space matters. Standard interior doors and tall wardrobes often reach heights of 2.1 to 2.4 metres, leaving very little clearance for hanging fixtures. To maintain a comfortable walking path, general thoroughfares should maintain a clear height of at least 2.3 metres from the floor to the bottom of the light fixture. This physical boundary makes flush-mount designs highly preferable over semi-flush or pendant options, which can obstruct movement or visually bisect the room.
The visual weight of a fixture is heavily influenced by its mounting style. Semi-flush fixtures, which hang slightly below the ceiling on a short stem, create a shadow gap above the light. In a 2.6-metre room, this often draws the eye downward, making the ceiling feel lower. In contrast, a true flush-mount fixture integrates smoothly with the ceiling plane, minimizing its visual footprint and allowing the eye to travel across the room uninterrupted.
Products mentioned in this guide
Prices are valid at publication and may change. Please refer to the product page for the latest price.
The color of the fixture’s frame also plays a significant role in spatial perception. Choosing a frame that matches the ceiling color—typically a matte white—helps the fixture blend into the background. While dark frames like matte black can serve as striking design accents, they create a sharp contrast against a light ceiling. This contrast can visually lower the ceiling height, so dark-framed fixtures are best reserved for larger rooms where the horizontal expanse balances the strong visual boundary.
Selecting the Right Profile and Dimensions
Choosing the correct physical dimensions for your ceiling light prevents the fixture from looking either lost or overwhelmingly large. To calculate a balanced diameter for a standard HDB room, a helpful guideline is to measure the room’s length and width in metres, add them together, and multiply by ten to get a starting diameter in millimetres. For example, a typical HDB bedroom measuring 3 metres by 3 metres would benefit from a fixture with a diameter of approximately 60 centimetres, though slightly smaller profiles around 40 to 50 centimetres often work well to maintain a minimalist aesthetic.

Thickness is the most critical dimension when maximizing vertical space in a 2.6-metre flat. Homeowners should target ultra-slim profiles with a total thickness of 5 centimetres or less. Modern LED technology allows for incredibly thin designs, with some low-profile panels measuring as little as 2 to 3 centimetres. These ultra-thin profiles sit almost flush with the plaster, mimicking the clean look of recessed downlights without requiring a false ceiling, which would otherwise reduce the room’s height even further.
In addition, edge-to-edge light emission designs, which feature a frameless border or a wrap-around diffuser, allow light to spill out horizontally across the ceiling plane. This wide distribution minimizes dark corners and reduces the harsh contrast between the bright light source and the surrounding ceiling. By illuminating the ceiling itself, these designs create an illusion of greater height and openness throughout the living space.
Matching Light Spread and Color Temperatures
Because the light source in a 2.6-metre room sits relatively close to eye level, selecting the right diffuser material is essential for visual comfort. High-quality acrylic or polycarbonate diffusers with a frosted, matte finish are highly recommended. These materials scatter the light evenly across the surface of the fixture, eliminating harsh hot spots from individual LED chips and preventing uncomfortable glare when looking up.
A three-color light offers three distinct color temperatures—typically daylight, cool white, and warm white—allowing you to customize the ambiance based on your activities. For high-focus tasks such as cooking or working in a home office, the crisp daylight setting provides excellent visibility. The cool white setting offers a balanced, natural light that is ideal for general daytime living and reading. When evening arrives, switching to the warm white setting creates a cozy, relaxing environment that helps the body wind down for sleep, making it a preferred choice for bedrooms and living areas during the night.
To ensure even illumination without harsh shadows, pay close attention to the fixture’s beam angle. A wide beam angle of 120 degrees or more is ideal for low-ceiling environments. Narrow beam angles can create a spotlight effect, leaving the upper portions of the walls in shadow and making the room feel smaller and more enclosed. A wide, even spread of light ensures that both the floor and the walls are adequately illuminated, enhancing the overall sense of space.
Electrical and Installation Requirements in HDB Flats
Before purchasing a three-color ceiling light, it is crucial to verify that your home’s electrical setup is compatible. Most three-color lights utilize a built-in electronic driver that cycles through the color temperatures each time the standard wall switch is toggled off and on within a few seconds. Ensure that your existing wall switches are standard on/off toggles and not traditional rotary dimmer switches, as dimmers can interfere with the electronic driver, leading to persistent flickering, buzzing, or premature component failure.
The physical installation on standard HDB concrete ceilings requires careful preparation. Because HDB ceilings are constructed from solid reinforced concrete, mounting a new fixture requires drilling holes using a rotary hammer drill and inserting high-quality masonry wall plugs. Standard plastic expansion plugs or concrete anchors must be sized correctly to match the weight of the fixture’s mounting plate. Always check the manufacturer’s specified weight limits and installation instructions to ensure a secure mount that can withstand long-term vibration and gravity.
Electrical safety must always be the top priority during installation. Before removing an old fixture or touching any wiring, isolate the mains power at the main distribution board by switching off the corresponding circuit breaker, and verify that the power is off using a reliable voltage tester. HDB flats often feature concealed conduits within the concrete slab; drilling blindly can damage these hidden electrical lines. If you are unsure of the conduit paths, need to run new wiring, or are uncomfortable working with fixed electrical installations, always engage a licensed electrical worker or a qualified professional to complete the job safely.
Common Sizing and Placement Mistakes to Avoid
One of the most frequent mistakes when selecting ceiling lights for low ceilings is choosing an oversized fixture. While a large light might seem like a good way to get more brightness, a massive fixture can visually dominate the ceiling plane, making the entire room feel cramped and unbalanced. It is far better to choose a moderately sized, high-efficiency slim fixture that provides adequate lumens without overwhelming the room’s proportions.
Another common oversight is failing to account for the height of tall furniture and built-in carpentry. Wardrobes with swing-out doors, tall bookshelves, and bunk beds can easily conflict with a ceiling light’s placement. A wardrobe door that swings too close to a flush-mount light can block the light path or even strike the fixture, while a bunk bed placed directly beneath or next to a light source can expose sleeping children to intense glare or accidental contact. Always map out your furniture layout before finalizing your light placement.
Finally, placing ceiling fixtures too close to walls can lead to poor light distribution. Unless a fixture is specifically designed for wall-washing, positioning a standard flush-mount light near a wall can create harsh, uneven pools of light and shadow. This close proximity also highlights minor plastering imperfections on the wall surface. Centering the fixture within the room’s main open area ensures a balanced light spread and a cleaner visual aesthetic.
Frequently Asked Questions (FAQ)
Can I use a standard wall switch to change the three color temperatures?
Yes, standard wall switches are fully compatible with most three-color ceiling lights. The fixture contains an internal driver that detects rapid power interruptions; toggling the switch off and on within a few seconds signals the driver to cycle to the next color temperature. If you prefer not to toggle the wall switch repeatedly, some models also support dedicated remote controls or smart home integration, which allow you to select specific color temperatures directly.
How do I safely clean a slim flush-mount ceiling light?
To clean your fixture safely, first turn off the power at the wall switch and isolate the circuit at the distribution board. Use a sturdy step ladder to reach the fixture comfortably, avoiding overreaching. Wipe the exterior of the diffuser with a dry or slightly damp microfiber cloth to remove dust; avoid using harsh chemical solvents or abrasive pads that could scratch the acrylic surface. Ensure no moisture enters the electrical housing, and allow the fixture to dry completely before restoring power.

Community discussion
Share your experience or ask a question. Comments are reviewed before publication.